
ML.NET Tutorial - Get started in 10 minutes
Intro
Purpose
Use ML.NET Model Builder in Visual Studio to train and use your first machine learning model with ML.NET.
Install the ML.NET CLI, then train and use your first machine learning model with ML.NET.
Prerequisites
None.
macOS 12.0 or later versions.
Time to Complete
10 minutes + download/installation time
Scenario
An app that can predict whether the text from customer reviews is negative or positive sentiment.
Download and install
Download and install Visual Studio 2026.
During installation, the .NET desktop development workload should be selected along with the optional ML.NET Model Builder component. Using the link above should preselect all the prerequisites correctly, as shown on the following image:

Already have Visual Studio 2026?
This tutorial is optimized for the latest version of Visual Studio. If you already have Visual Studio 2026, ensure it's up to date and has the required workload installed:
-
Find the Visual Studio Installer on your computer.
In the Windows Start menu, search for "
installer", and then select Visual Studio Installer from the results. - If prompted, allow the installer to update itself.
- If an update for Visual Studio 2026 is available, an Update button will be shown. Select it to update before modifying the installation. We recommend using the latest Visual Studio 2026 version for this tutorial.
- Find your Visual Studio 2026 installation and select Modify.
- Select .NET desktop development and make sure ML.NET Model Builder is selected on the right pane. Select the Modify button.
Upgrade to the latest version of Model Builder
Once you've enabled ML.NET Model Builder in Visual Studio, download and install the latest version.
Download the latest version of Model Builder
After downloading, install the extension by double clicking the .vsix file.
Install .NET SDK
To build .NET apps, you need to download and install the .NET 8 SDK (Software Development Kit).
Download .NET 8 SDK x64 (Intel)
Download .NET 8 SDK Arm64 (Apple Silicon)
If you're on a Mac with an Apple M1 or M2 chip, you need to install the Arm64 version of the SDK.
Install ML.NET CLI
The ML.NET command-line interface (CLI), provides tools for building machine learning models with ML.NET.
Note: Currently, ML.NET CLI is in Preview and only supports the previous LTS version of the .NET SDK (.NET 8).
For the installation steps, we recommend you use a Bash console. Since the default for macOS is a zsh console, you can create a singular instance by opening up a new terminal and running the command below.
bashFOR x64 MACHINES - Run the following command:
dotnet tool install -g mlnet-linux-x64FOR ARM64 CHIP ARCHITECTURES - Run the following command instead:
dotnet tool install -g mlnet-linux-arm64If the tool installs successfully, you should see the following output message where [arch] is the chip architecture:
You can invoke the tool using the following command: mlnet
Tool 'mlnet-linux-[arch]' (version 'X.X.X') was successfully installed.dotnet tool install -g mlnet-osx-x64FOR ARM64 CHIP ARCHITECTURES - Run the following command instead:
dotnet tool install -g mlnet-osx-arm64If the tool installs successfully, you should see an output message where [arch] is the chip architecture similar to the following:
You can invoke the tool using the following command: mlnet
Tool 'mlnet-osx-[arch]' (version 'X.X.X') was successfully installed.
Note: If you're using a console other than Bash (for example, zsh, which is the new default for macOS), then you'll need to give mlnet executable permissions and include mlnet to the system path. Instructions on how to do this should appear in the terminal when you install mlnet (or any global tool). In general, the following command should work for most systems: chmod +x [PATH-TO-MLNET-CLI-EXECUTABLE]
If you see instructions similar to the one below, run them in your terminal.
cat << \EOF >> ~/.zprofile
#Add .NET Core SDK tools
export  PATH="$PATH:~/.dotnet/tools"
EOF
Alternatively, you can try using the following command to run the mlnet tool:
~/.dotnet/tools/mlnetIf the command still gives you an error, use the I ran into an issue button below to report the issue and get help fixing the problem.
Create your app
Open Visual Studio and create a new .NET console app:
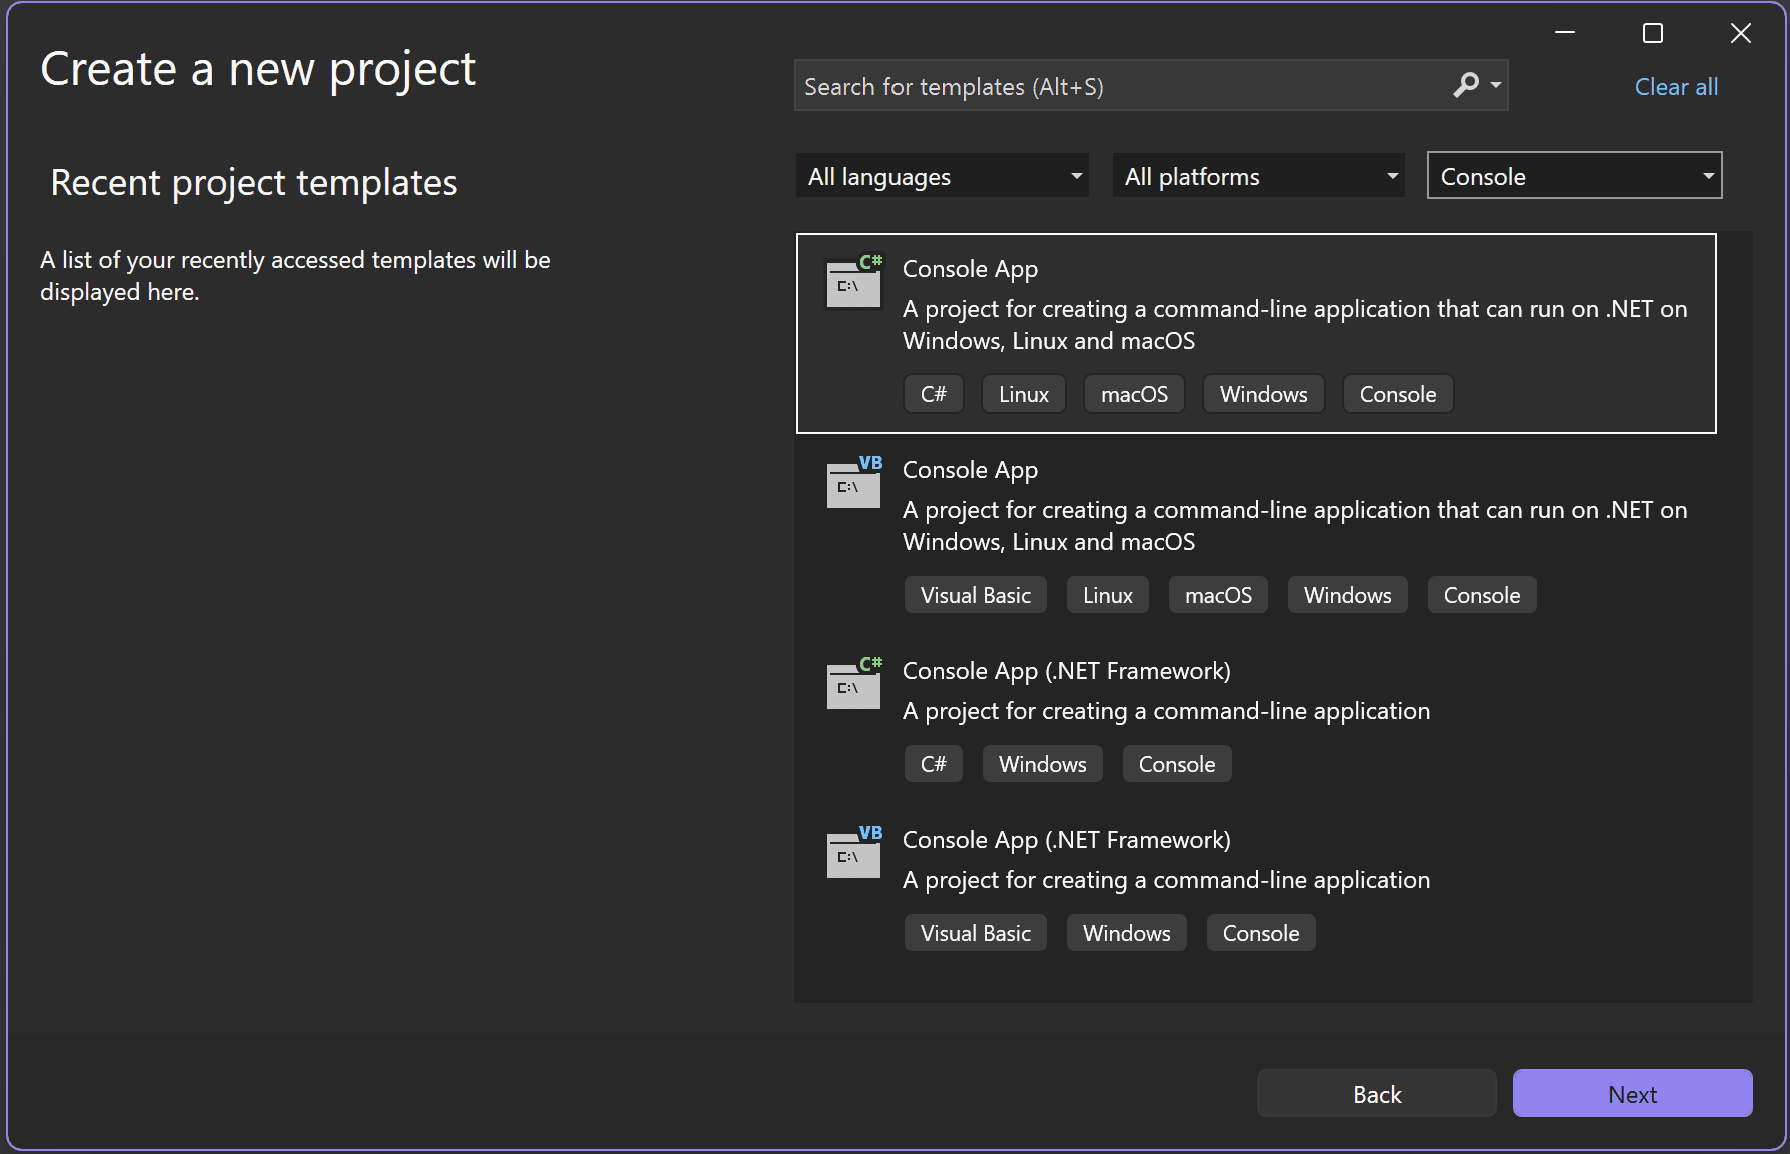
- Select Create a new project from the Visual Studio 2026 start window.
-
Select the C# Console App project template.
![Screenshot of Visual Studio start screen.]()
- Select the Next button.
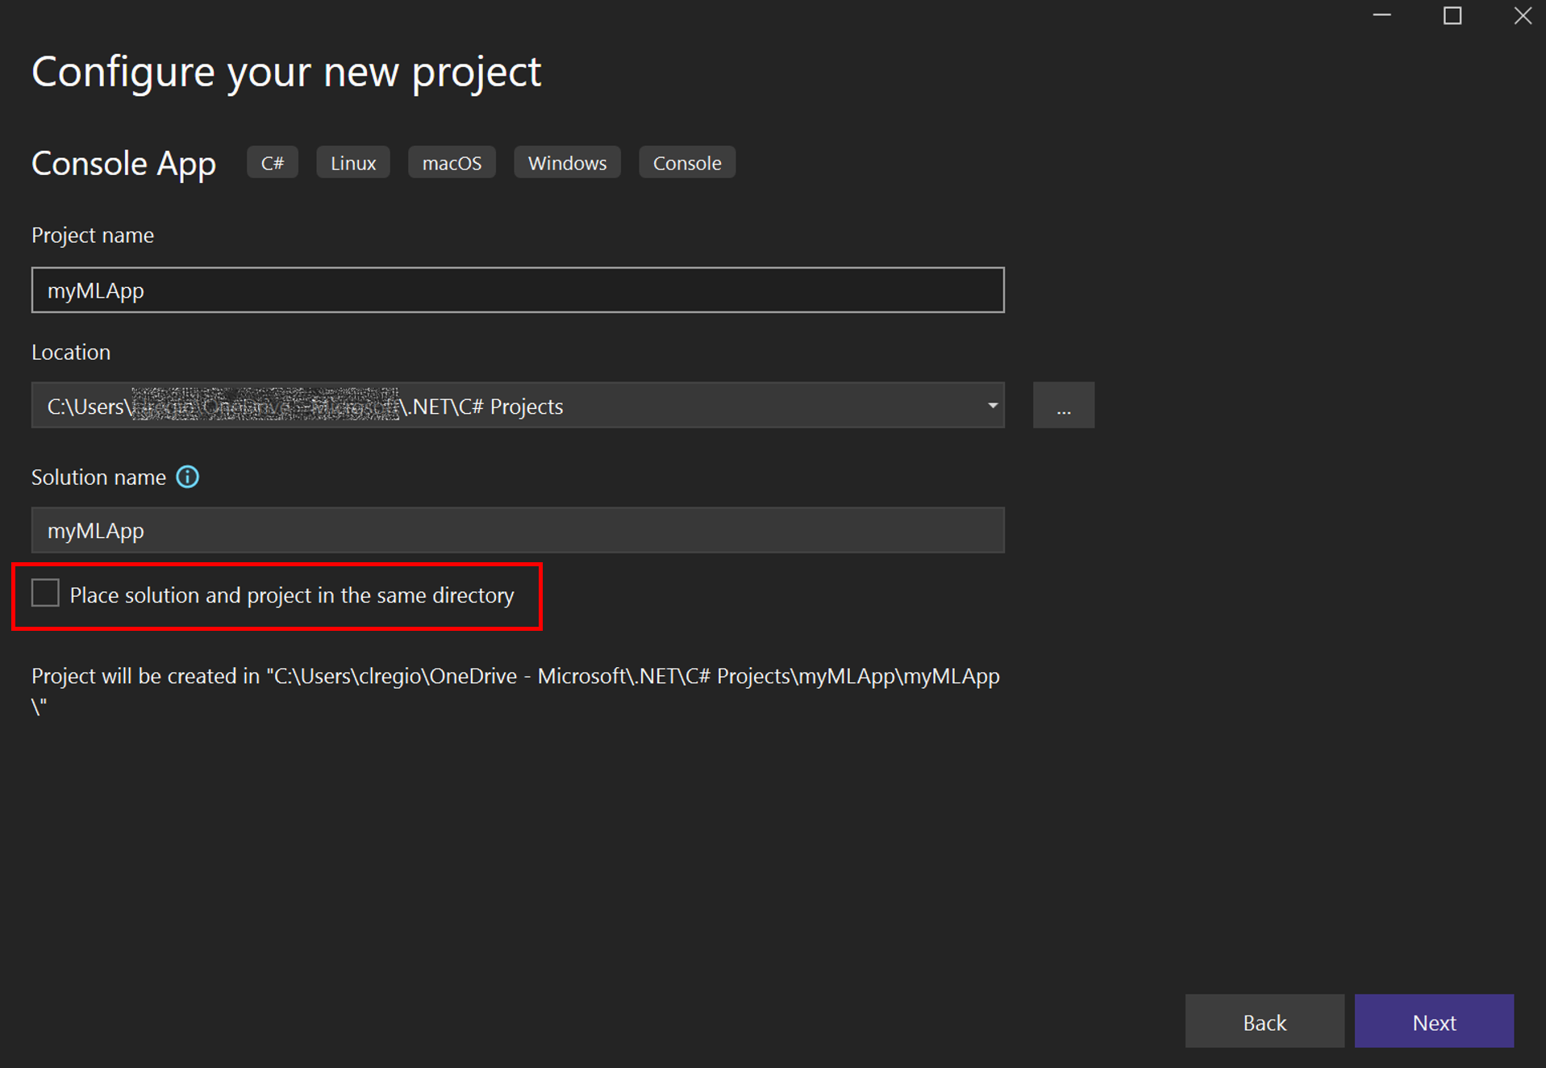
- Change the project name to
myMLApp. -
Make sure Place solution and project in the same directory is unchecked.
![Screenshot of Visual Studio project configuration screen.]()
- Select the Next button.
- Select .NET 10.0 (Long Term support) as the Framework.
- Select the Create button. Visual Studio creates your project and loads the
Program.csfile.
Add machine learning
- Open the Solution Explorer tab. You can open it by using the View > Solution Explorer menu, or by selecting Ctrl + Alt + L.
-
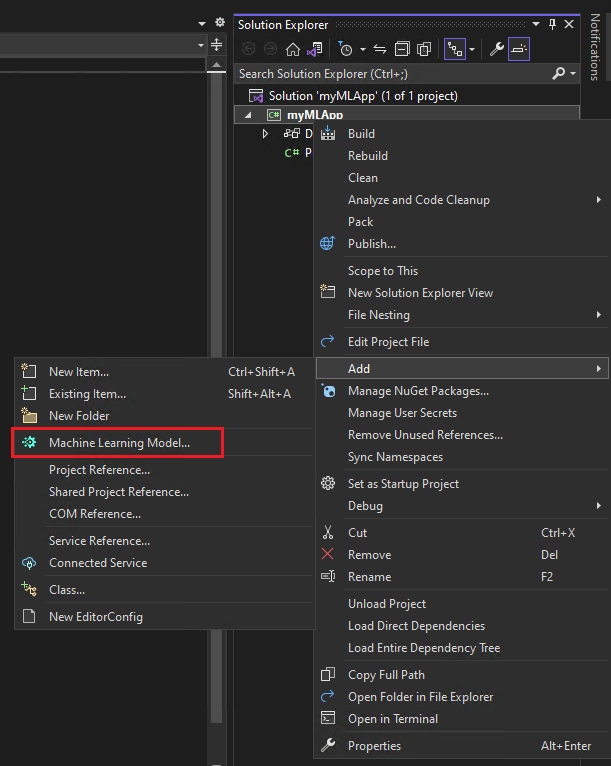
Right-click on the
myMLAppproject in Solution Explorer and select Add > Machine Learning Model.![Screenshot of Visual Studio showing the Machine Learning Model selected.]()
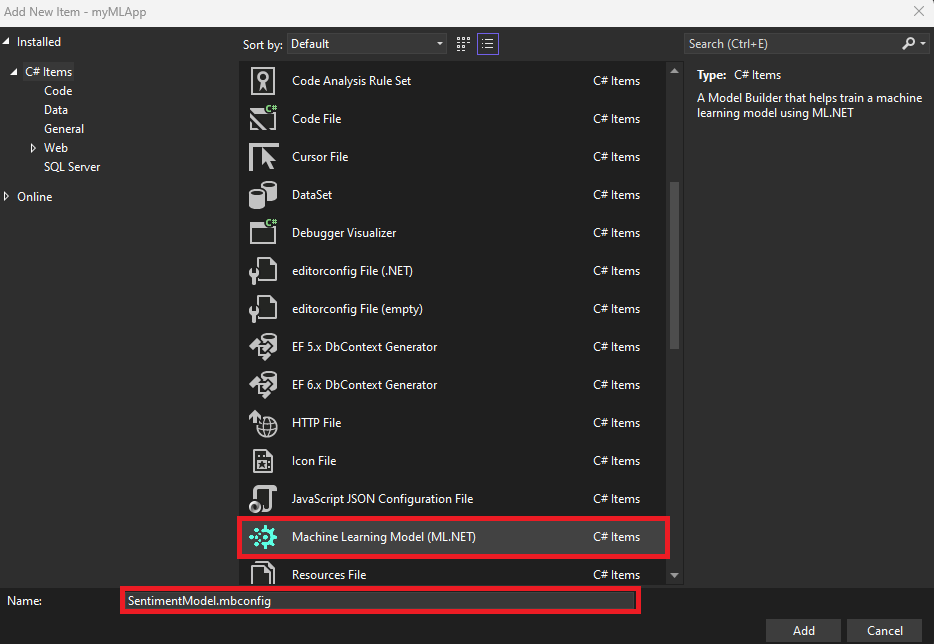
- In the Add New Item dialog, make sure Machine Learning Model (ML.NET) is selected.
-
Change the Name field to
SentimentModel.mbconfigand select the Add button.![Add New Item dialog showing Machine Learning Model (ML.NET) selected and SentimentModel.mbconfig as the file name.]()
A new file named SentimentModel.mbconfig is added to your solution and the Model Builder UI opens in a new docked tool window in Visual Studio. The mbconfig file is simply a JSON file that keeps track of the state of the UI.
Model Builder will guide you through the process of building a machine learning model in the following steps.
In your terminal, run the following commands:
mkdir myMLApp
cd myMLApp
The mkdir command creates a new directory named myMLApp, and the cd myMLApp command puts you into the newly created app directory.
Your model training code will be generated in the upcoming steps.
Pick a scenario
To generate your model, you first need to select your machine learning scenario. Model Builder supports several scenarios:
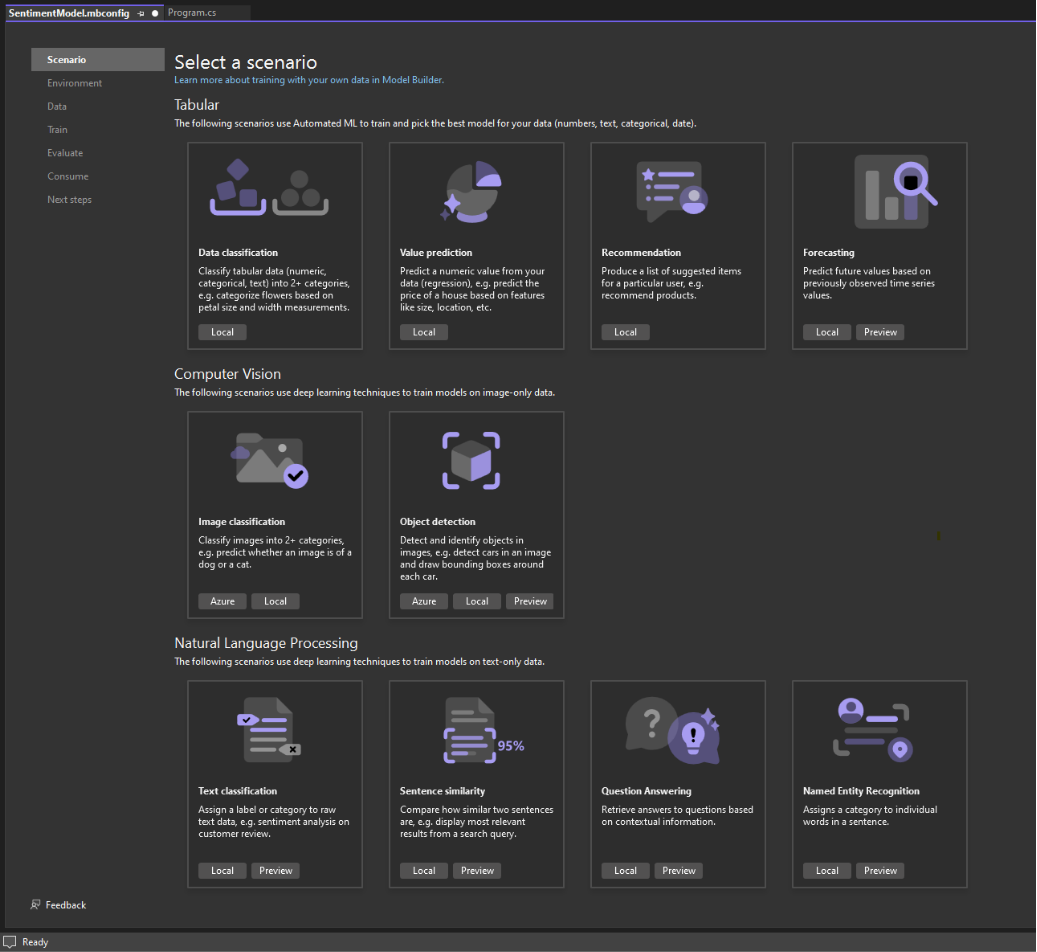
Note: If the tutorial screenshots don't match with what you see, you may need to update your version of Model Builder. Go to Extensions > Manage Extensions to make sure that there are no available updates for Model Builder. The version used in this tutorial is 17.19.2.
In this case, you'll predict sentiment based on the content (text) of customer reviews.
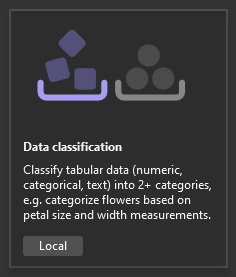
-
In the Model Builder Scenario screen, select the Data classification scenario, since you're predicting which category a comment falls into (positive or negative).
![Screenshot of Model Builder's data classification option.]()
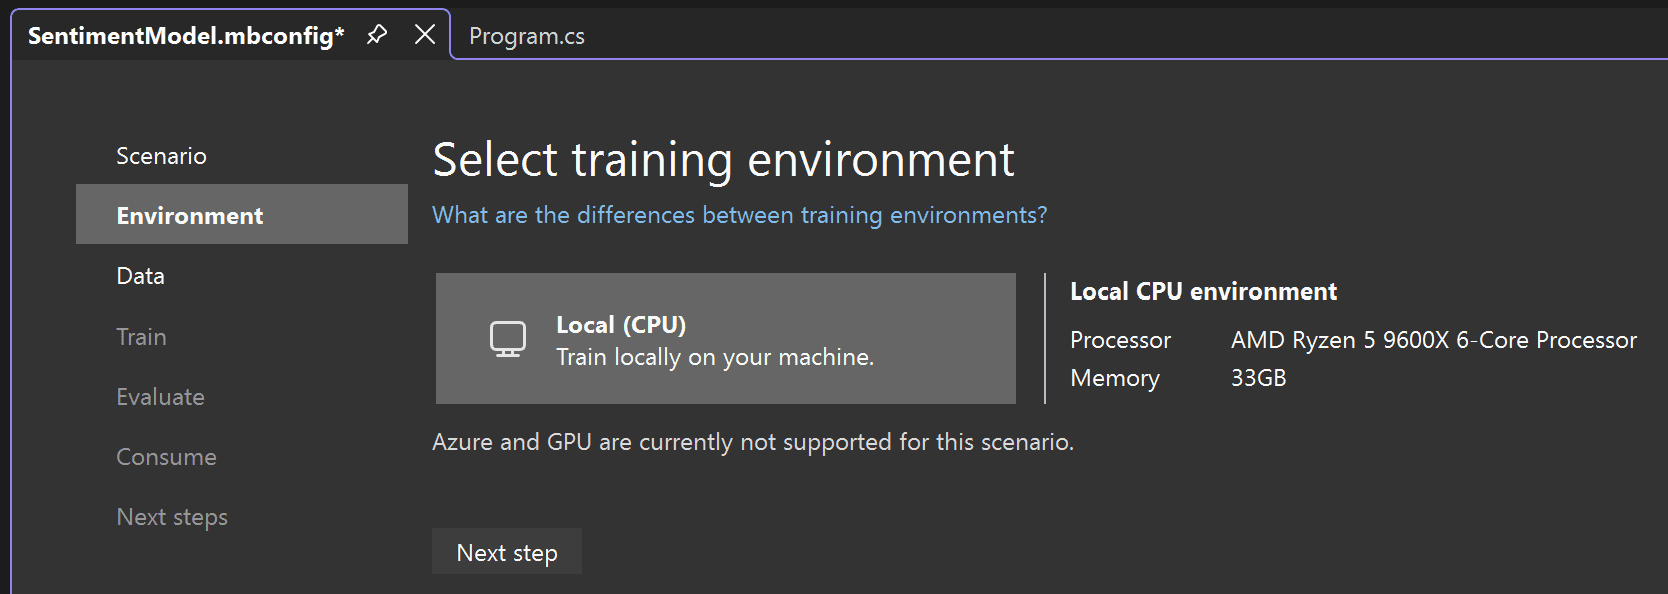
-
After selecting the Data classification scenario, you must choose your training environment. While some scenarios support training in Azure, Classification currently only supports local training, so keep the Local environment selected and move on to the Data step.
![Local training environment is selected in Model Builder.]()
To generate your model, you need to select your machine learning scenario.
There are several ML scenarios that are supported by the ML.NET CLI:
- Classification - Use this when you want to predict which category data belongs in (for example, analyzing sentiment of customer reviews as either positive or negative).
- Image classification - Use this when you want to predict which category an image belongs to (for example, predicting if an image is of a cat or a dog).
- Regression (for example, value prediction) - Use this when you want to predict a numeric value (for example, predicting house price).
- Forecasting - Use this when you want to forecast future values in a time-series (for example, forecast quarterly sales).
- Recommendation - Use this when you want to recommend items to users based on historical ratings (for example, product recommendation).
In this case, you'll predict sentiment based on the content (text) of customer reviews, so you'll use classification.
Download and add data
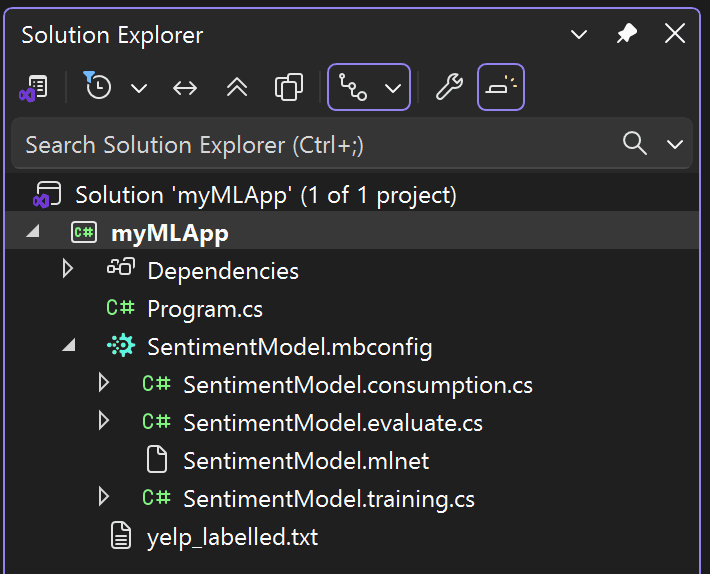
Download the Sentiment Labelled Sentences datasets from the UCI Machine Learning Repository. Unzip sentiment labelled sentences.zip and save the yelp_labelled.txt file to the myMLApp directory.
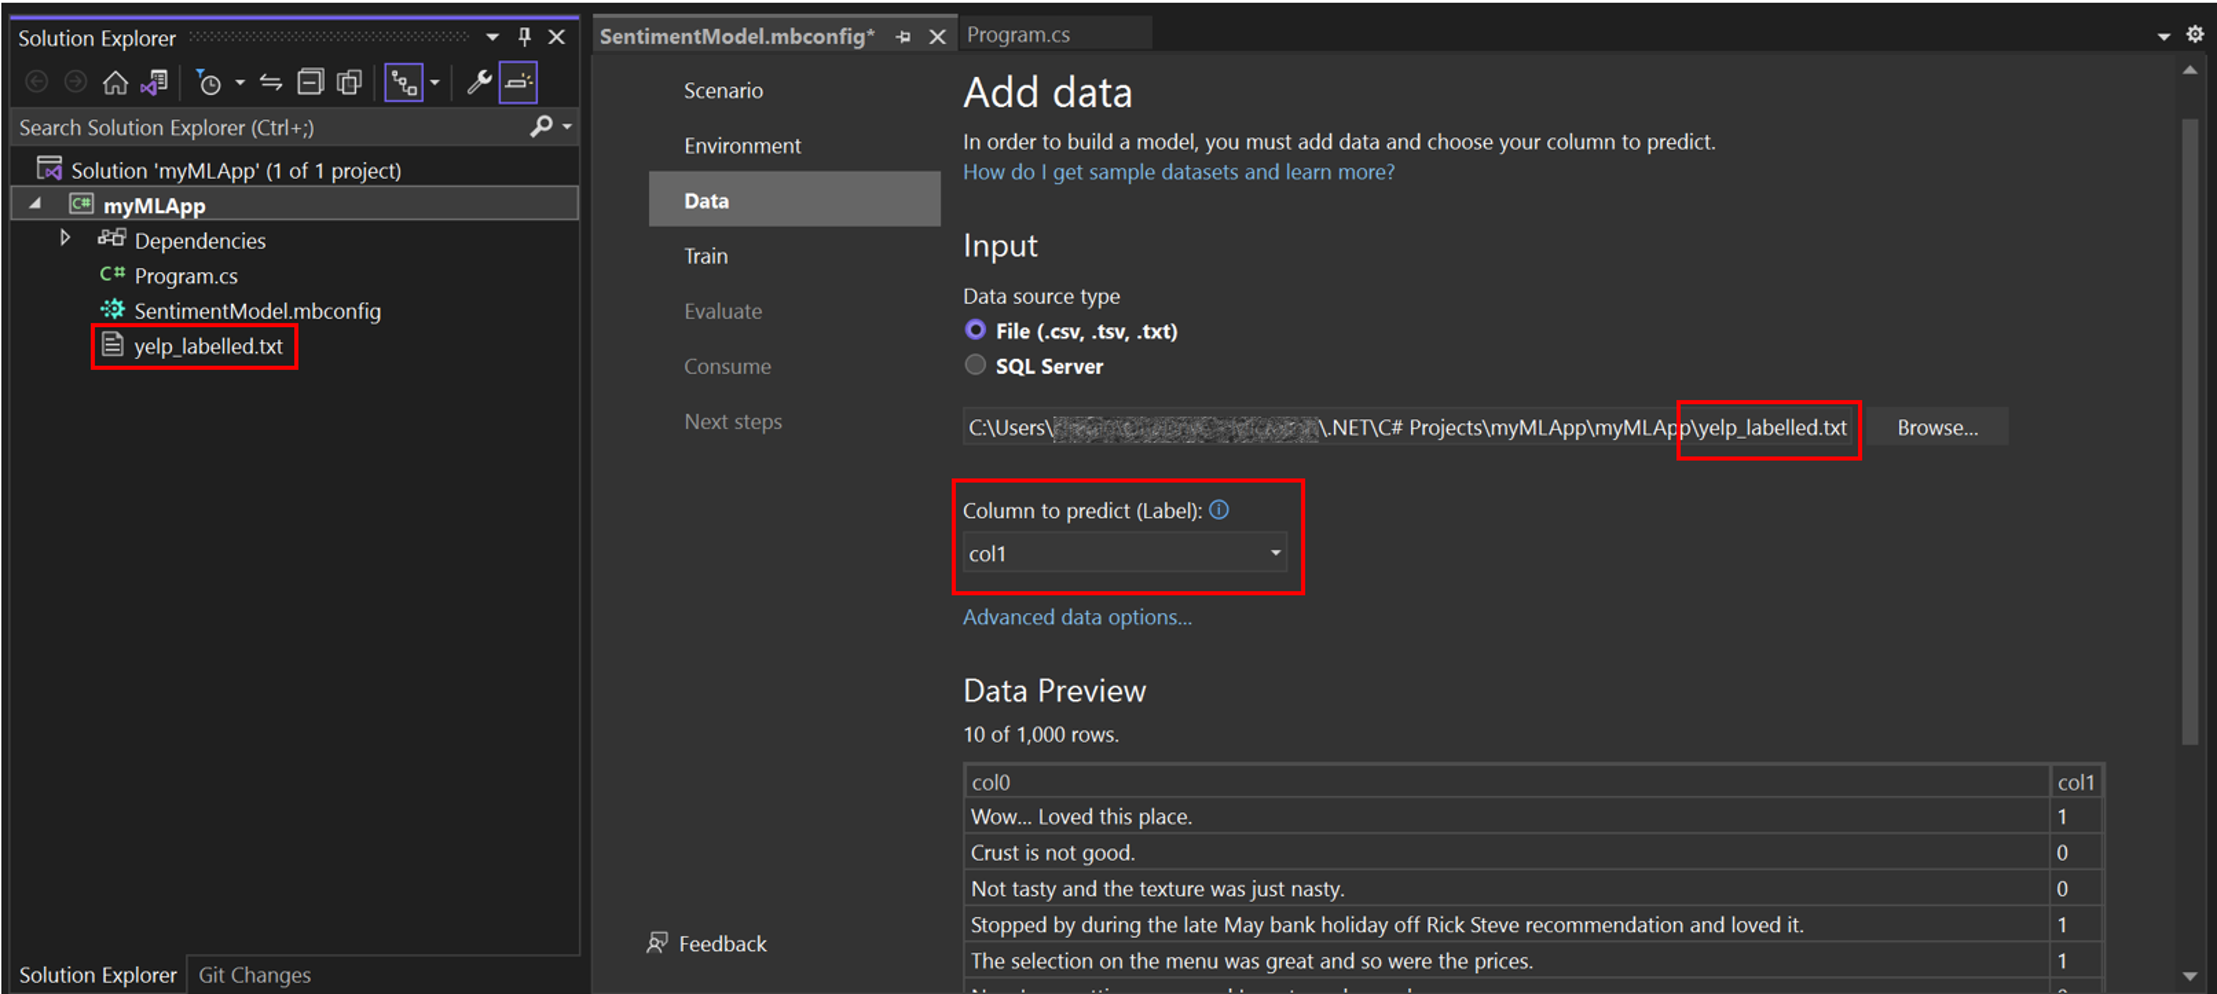
Your Solution Explorer should look like the following:
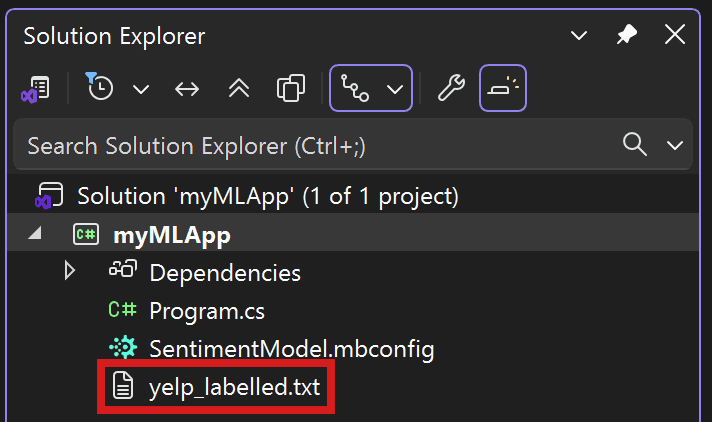
Each row in yelp_labelled.txt represents a different review of a restaurant left by a user on Yelp. The first column represents the comment left by the user, and the second column represents the sentiment of the text (0 is negative, 1 is positive). The columns are separated by tabs, and the dataset has no header. The data looks like the following:
Wow... Loved this place.	        1
Crust is not good.	        0
Not tasty and the texture was just nasty.	        0
Add data
In Model Builder, you can add data from a local file or connect to a SQL Server database. In this case, you'll add yelp_labelled.txt from a file.
Select File as the input data source type.
Browse for
yelp_labelled.txt. Once you select your dataset, a preview of your data appears in the Data Preview section. Since your dataset does not have a header, headers are auto-generated ("col0" and "col1").Under Column to predict (Label), select "col1". The Label is what you're predicting, which in this case is the sentiment found in the second column ("col1") of the dataset.
The columns that are used to help predict the Label are called Features. All of the columns in the dataset besides the Label are automatically selected as Features. In this case, the review comment column ("col0") is the Feature column. You can update the Feature columns and modify other data loading options in Advanced data options, but it is not necessary for this example.
After adding your data, go to the Train step.
Train your model
Now, you'll train your model with the yelp_labelled.txt dataset.
Model Builder evaluates many models with varying algorithms and settings based on the amount of training time given to build the best performing model.
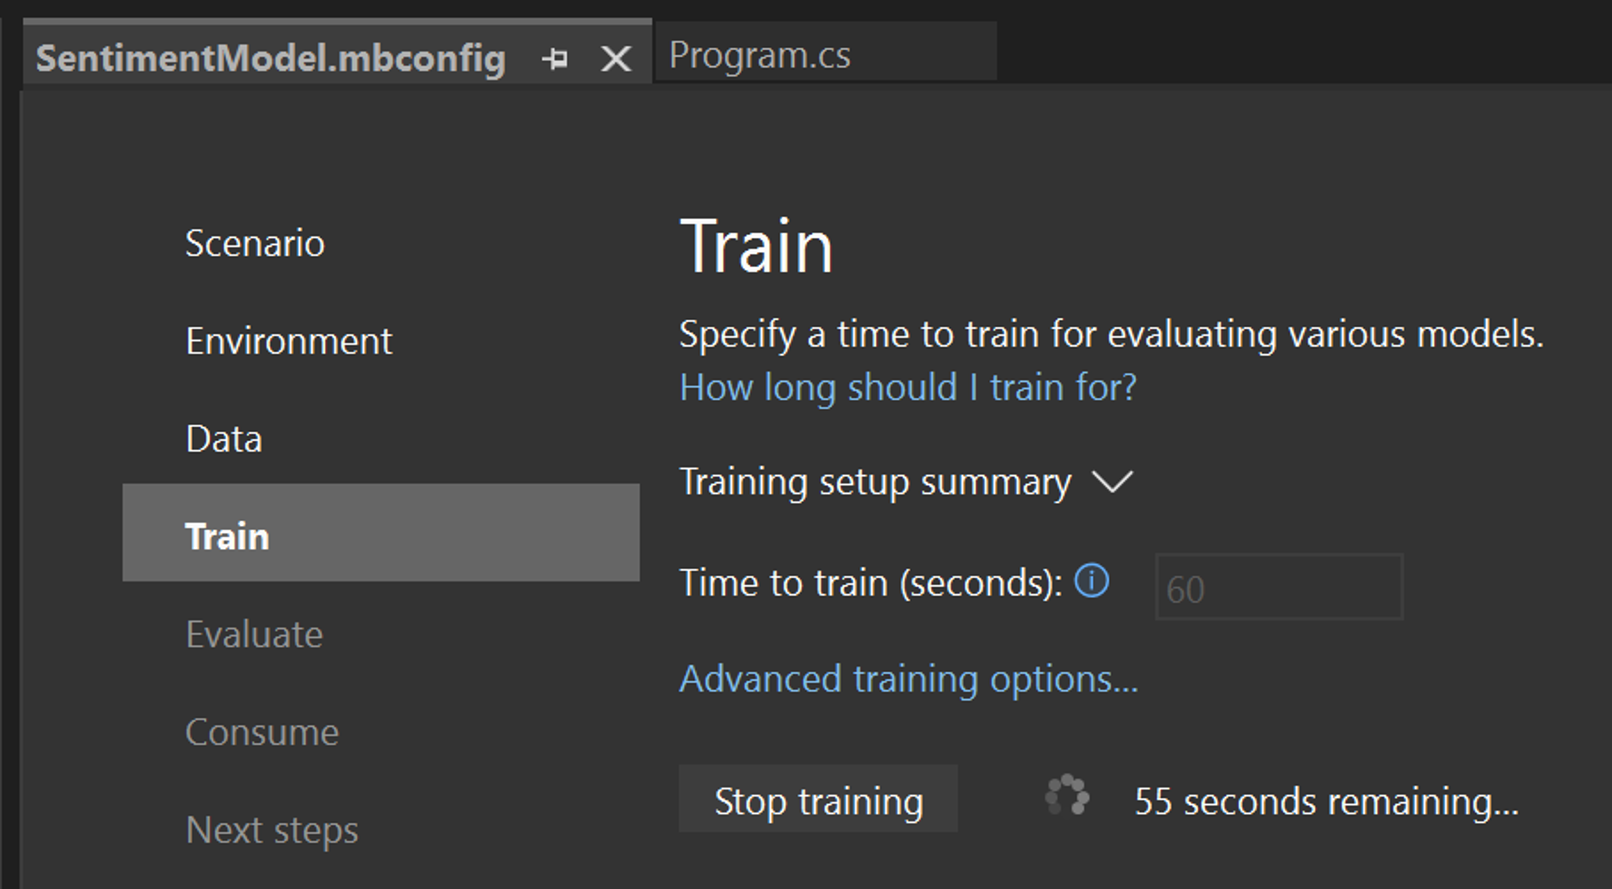
Time to train, which is the amount of time you'd like Model Builder to explore various models, is automatically set to 60 seconds. Note that for larger datasets, the training time will be longer. Model Builder automatically adjusts the training time based on the dataset size.
You can update the optimization metric and algorithms used in Advanced training options, but it is not necessary for this example.
-
Select Start training to start the training process. Once training starts, you can see the time remaining.
![Model Builder Train]()
Training results
Once training is done, you can see a summary of the training results.
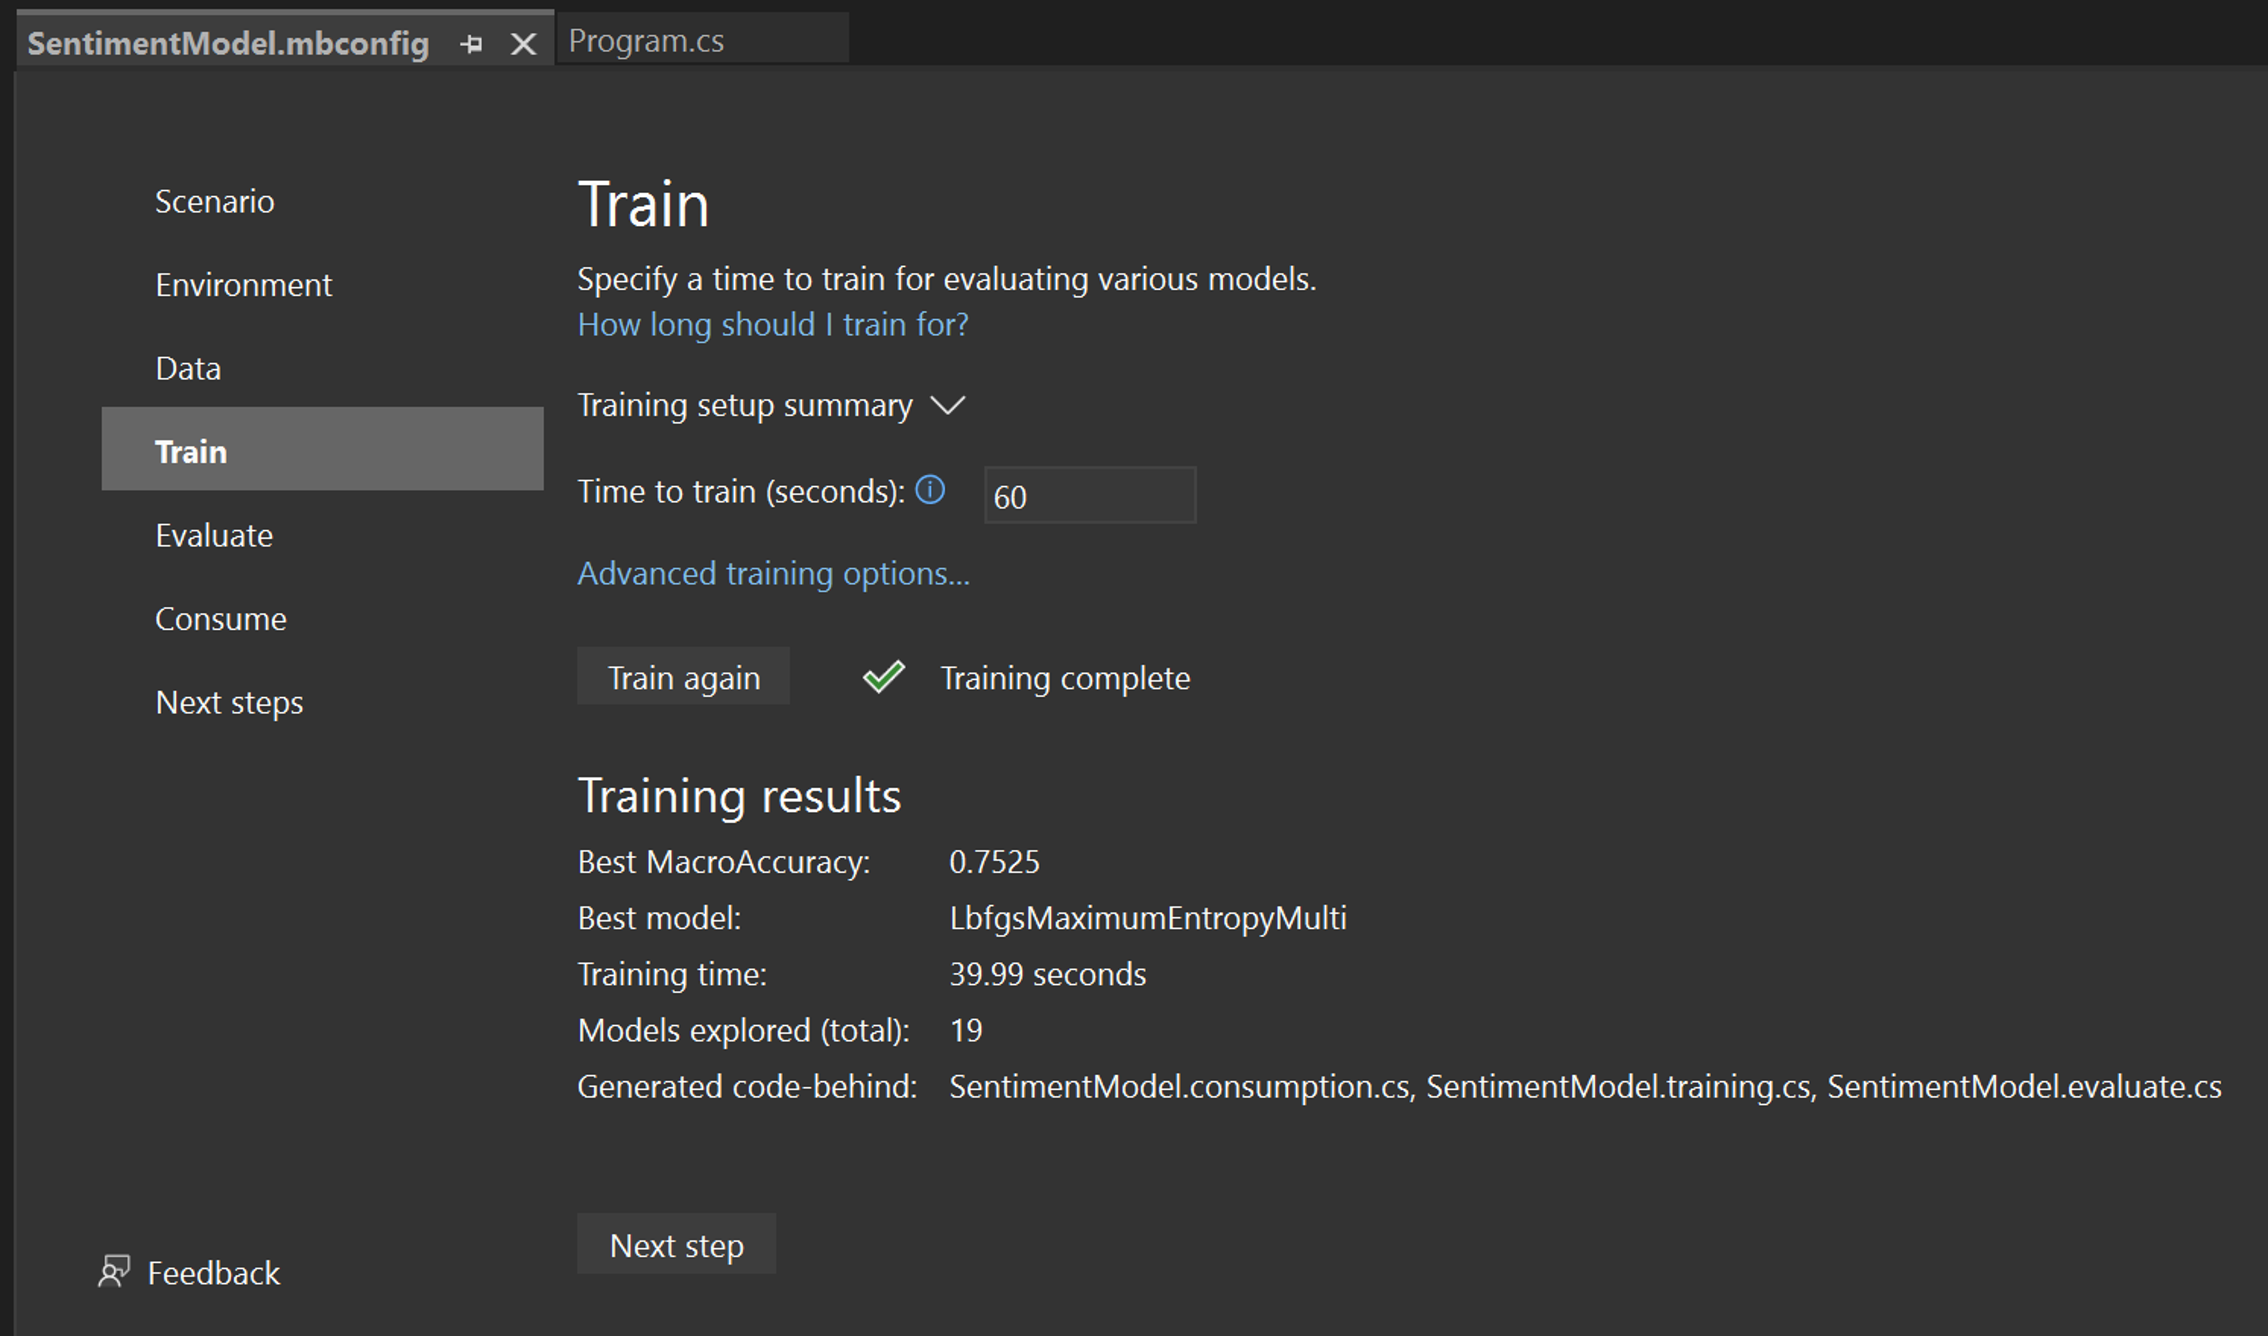
- Best MacroAccuracy - This shows you the accuracy of the best model that Model Builder found. Higher accuracy means the model predicted more correctly on test data.
- Best model - This shows you which algorithm performed the best during Model Builder's exploration.
- Training time - This shows you the total amount of time that was spent training / exploring models.
- Models explored (total) - This shows you the total number of models explored by Model Builder in the given amount of time.
- Generated code-behind - This shows you the names of the files generated to help consume the model or train a new model.
If you want, you can view more information about the training session in the Machine Learning Output window.
After model training finishes, go to the Evaluate step.
In your terminal, run the following command (in your myMLApp folder):
mlnet classification --dataset "yelp_labelled.txt" --label-col 1 --has-header false --name SentimentModel --train-time 60What do these commands mean?
The mlnet classification command runs ML.NET with AutoML to explore many iterations of classification models in the given amount of train time with varying combinations of data transformations, algorithms, and algorithm options and then chooses the highest performing model.
- --dataset: You chose
yelp_labelled.txtas the dataset (internally, the CLI will split the one dataset into training and testing datasets). - --label-col: You must specify the target column you want to predict (or the Label). In this case, you want to predict the sentiment in the second column (zero-indexed columns means this is column "1").
- --has-header: Use this option to specify if the dataset has a header. In this case, the dataset doesn't have a header, so it's false.
- --name: Use this option to provide a name for your machine learning model and related assets. In this case, all assets associated with this machine learning model will have SentimentModel in the name.
- --train-time: You must also specify the amount of time you'd like the ML.NET CLI to explore different models. In this case, 60 seconds (you can try increasing this number if no models are found after training). Note that for larger datasets, you should set a longer training time.
Progress
While the ML.NET CLI is exploring different models, it displays the following data:
- Start training - This section shows each model iteration, including the trainer (algorithm) used and evaluation metrics for that iteration.
- Time left - This and the progress bar will indicate how much time is left in the training process in seconds.
- Best algorithm - This shows you which algorithm has performed the best so far.
- Best score - This shows you the performance of the best model so far. Higher accuracy means the model predicted more correctly on test data.
If you want, you can view more information about the training session in the log file generated by the CLI.
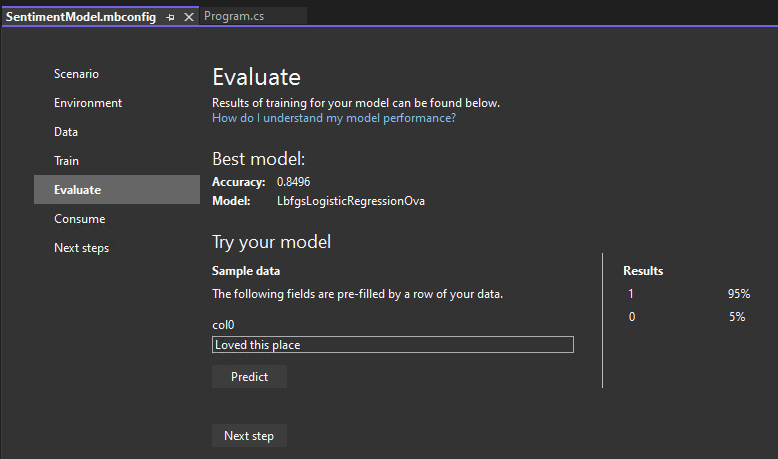
Evaluate your model
The Evaluate step shows you the best-performing algorithm and the best accuracy and lets you try out the model in the UI.
Try out your model
You can make predictions on sample input in the Try your model section. The textbox is pre-filled with the first line of data from your dataset, but you can change the input and select the Predict button to try out different sentiment predictions.
In this case, 0 means negative sentiment and 1 means positive sentiment.
Note: If your model is not performing well (for example, if the Accuracy is low or if the model only predicts '1' values), you can try adding more time and training again. This is a sample using a very small dataset; for production-level models, you'd want to add a lot more data and training time.
After evaluating and trying out your model, move on to the Consume step.
After the ML.NET CLI selects the best model, it will display the training Summary, which shows you a summary of the exploration process, including how many models were explored in the given training time.

Top models
While the ML.NET CLI generates code for the highest performing model, it also displays the top models (up to 5) with the highest accuracy that it found in the given exploration time. It displays several evaluation metrics for those top models, including AUC, AUPRC, and F1-score. For more information, see ML.NET metrics.
Generate code
After training is completed, four files are automatically added as code-behind to the SentimentModel.mbconfig:
SentimentModel.consumption.cs: This file contains the model input and output classes and aPredictmethod that can be used for model consumption.SentimentModel.evaluate.cs: This file contains aCalculatePFImethod that uses the Permutation Feature Importance (PFI) technique to evaluate which features contribute most to the model predictions.SentimentModel.mlnet: This file is the trained ML.NET model, which is a serialized zip file.SentimentModel.training.cs: This file contains the code to understand the importance input columns have on your model predictions.
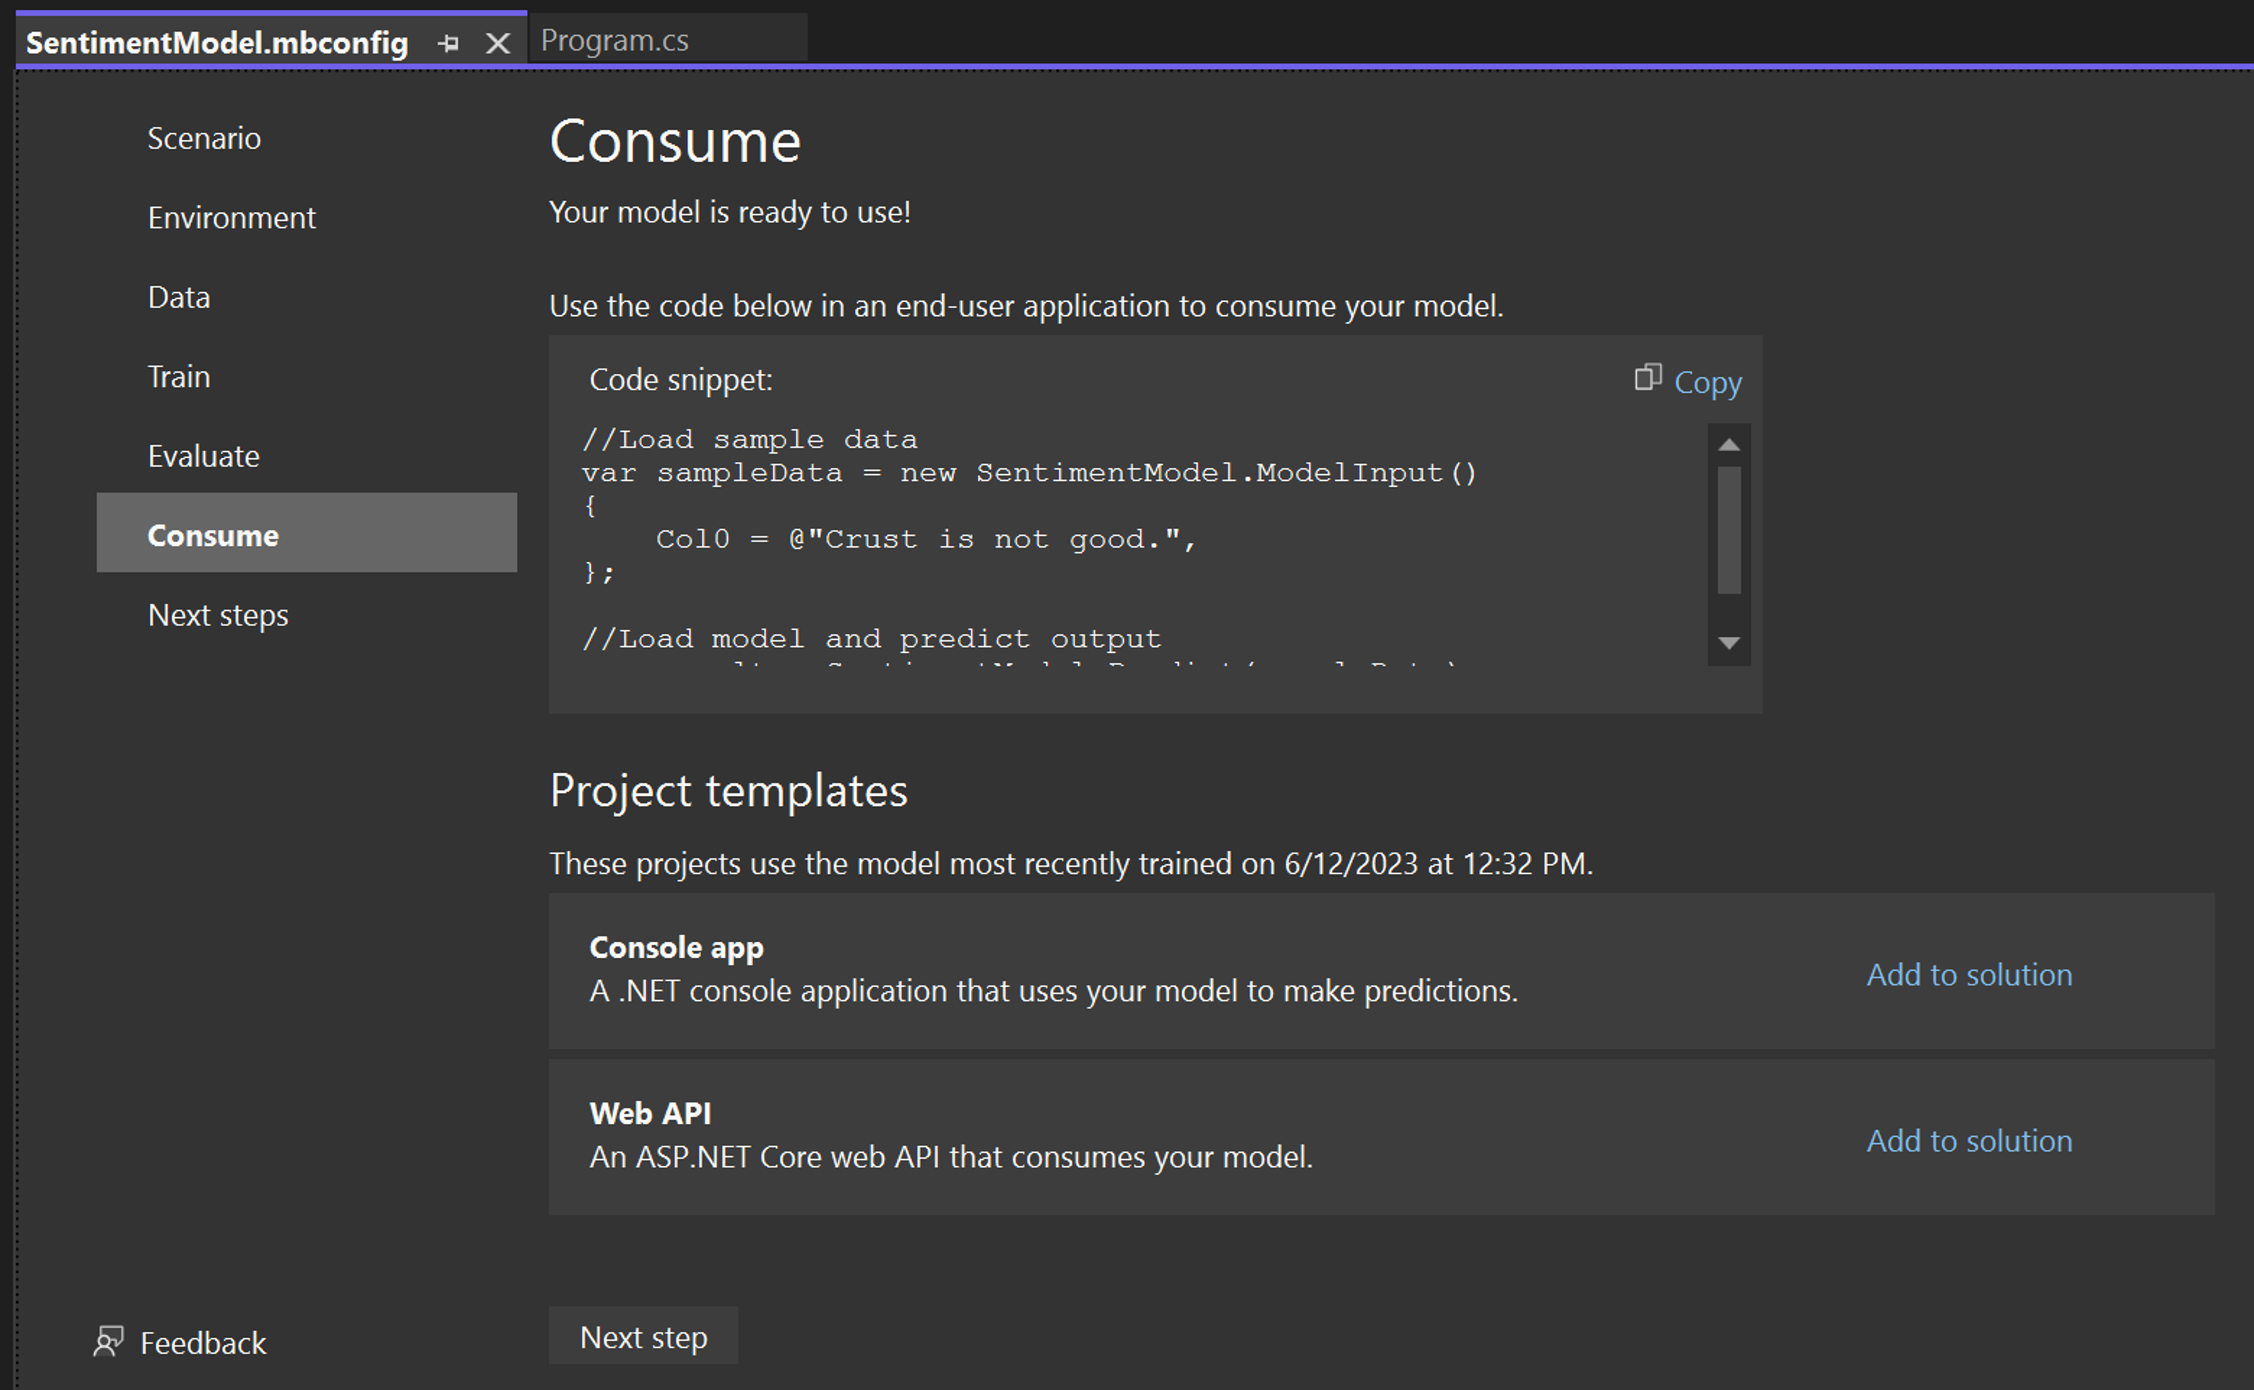
In the Consume step in Model Builder, a code snippet is provided which creates sample input for the model and uses the model to make a prediction on that input.
Model Builder also offers Project templates that you can optionally add to your solution. There are two project templates (a console app and a web API), both which consume the trained model.
The ML.NET CLI adds both the machine learning model and the code for training and consuming the model, which includes the following:
-
A new directory called SentimentModel is created containing a .NET console app that includes the following files:
Program.cs: This file contains code to run the model.SentimentModel.consumption.cs: This file contains the model input and output classes and aPredictmethod that can be used for model consumption.SentimentModel.mbconfig: This file is a JSON file that keeps track of the configurations and results from your training.SentimentModel.training.cs: This file contains the training pipeline (data transforms, algorithm, and algorithm parameters) used to train the final model.SentimentModel.zip: This file is the trained ML.NET model, which is a serialized zip file.
To try the model, you can run the console app to predict the sentiment of a single statement with the model.
Consume your model
The last step is to consume your trained model in the end-user application.
-
Replace the
Program.cscode in yourmyMLAppproject with the following code:Program.csusing MyMLApp; // Add input data var sampleData = new SentimentModel.ModelInput() { Col0 = "This restaurant was wonderful." }; // Load model and predict output of sample data var result = SentimentModel.Predict(sampleData); // If Prediction is 1, sentiment is "Positive"; otherwise, sentiment is "Negative" var sentiment = result.PredictedLabel == 1 ? "Positive" : "Negative"; Console.WriteLine($"Text: {sampleData.Col0}\nSentiment: {sentiment}"); -
Run
myMLApp(select Ctrl+F5 or Debug > Start Without Debugging). You should see the following output, predicting whether the input statement is positive or negative.![The output: Text: This restaurant was wonderful. Sentiment: Positive]()

The ML.NET CLI has generated the trained model and code for you, so you can now use the model in .NET applications (for example, your SentimentModel console app) by following these steps:
- In the command line, navigate to the
consumeModelAppdirectory.Command promptcd SentimentModel -
Open the
Program.csin any code editor and inspect the code. The code should look similar to the following:Program.csusing System; namespace SentimentModel.ConsoleApp { class Program { static void Main(string[] args) { // Add input data SentimentModel.ModelInput sampleData = new SentimentModel.ModelInput() { Col0 = @"Wow... Loved this place." }; // Make a single prediction on the sample data and print results var predictionResult = SentimentModel.Predict(sampleData); Console.WriteLine("Using model to make single prediction -- Comparing actual Col1 with predicted Col1 from sample data...\n\n"); Console.WriteLine($"Col0: @{"Wow... Loved this place."}"); Console.WriteLine($"Col1: {1F}"); Console.WriteLine($"\n\nPredicted Col1: {predictionResult.PredictedLabel}\n\n"); Console.WriteLine("=============== End of process, hit any key to finish ==============="); Console.ReadKey(); } } } -
Run your
SentimentModel.ConsoleApp. You can do this by running the following command in the terminal (make sure you are in theSentimentModeldirectory):Command promptdotnet runThe output should look something like this:
Command promptUsing model to make single prediction -- Comparing actual Col1 with predicted Col1 from sample data... Col0: Wow... Loved this place. Col1: 1 Class Score ----- ----- 1 0.9651076 0 0.034892436 =============== End of process, hit any key to finish ===============
Next steps
Congratulations, you've built your first machine learning model with ML.NET Model Builder!
Now that you've got the basics, continue to with this with self-guided learning module on Microsoft Learn, where you'll use sensor data to detect whether a manufacturing device is broken.
Microsoft Learn: Train a predictive maintenance model
ML.NET for Beginners
Let Luis introduce you to the concepts of machine learning & AI, explain what you can do with it, and guide you on how to get started with OpenAI, Azure AI Services, and ML.NET:
You might also be interested in...


Congratulations, you've built your first machine learning model with the ML.NET CLI!
Now that you've used the ML.NET CLI for Classification (specifically sentiment analysis), you can try other scenarios. Try out a Regression scenario (specifically price prediction) using the Taxi Fare dataset to keep building ML.NET models with the ML.NET CLI.
Download the Taxi Fare dataset
ML.NET for Beginners
Let Luis introduce you to the concept of machine learning & AI, explain what you can do with it, and guide you on how to get started with OpenAI, Azure AI Services, and ML.NET:
You might also be interested in...